November 5, 2025
8 min
Supercharge Your Webflow Site: The Ultimate Guide to Page Speed Optimization
 TO
TOTom OsowskiDesigner
Intro
A Webflow project can be smooth and efficient, or it can feel heavy and slow. The difference comes down to how you handle performance.
Webflow simplifies the development process, but it doesn’t override the fundamentals of web performance. When those basics are ignored, you end up with a site that looks great yet silently drags behind: slow to load, heavy to render, and frustrating to navigate.
This guide walks through the key areas that matter most. Not a list of generic “speed tips,” but the real, technical levers that make measurable difference—from image formats and font loading to the TTFB issues that no on-page tweak can fix.
Let’s turn that design into a site that actually moves fast.
Image Optimization
Images are almost always the largest assets on a webpage. They shape the first impression of speed—or the lack of it. When handled carelessly, they’re responsible for the biggest slowdowns. When handled well, they’re your fastest win.
1. Prioritize <img> Tags Over CSS Backgrounds for Content Images
Images added through CSS are part of the render-blocking stylesheet. The browser can’t show anything until it downloads them, even if those visuals appear far down the page. In one of our Webflow audits, this single habit delayed the first render by more than a second.
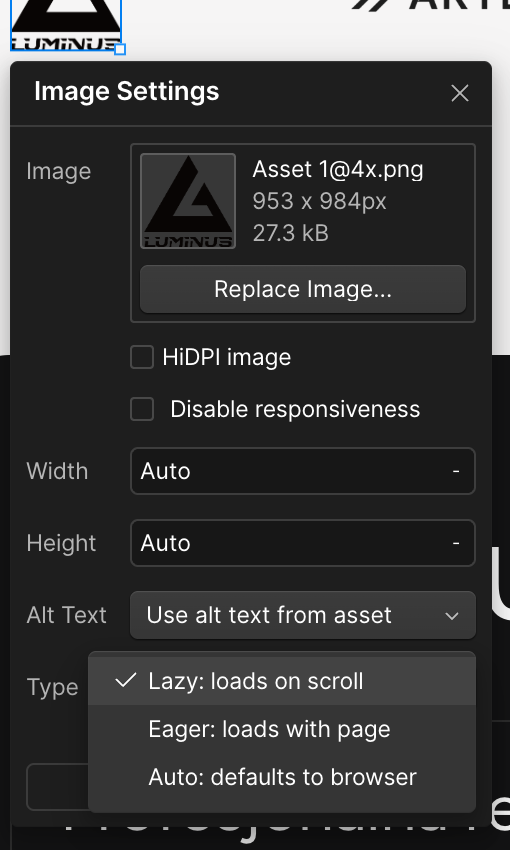
What to do: For any image that carries meaning—product shots or diagrams—use a standard <img> element. Add loading="lazy" so the browser waits to download it until it’s actually needed. You’ll see an immediate drop in initial load time.

Caution
Don’t lazy-load images that appear above the fold (the part of the page visible without scrolling) or are likely in the viewport when the page first loads — especially your LCP (Largest Contentful Paint) image. Think hero banners or featured product shots. Lazy-loading these can actually hurt performance by delaying key visuals instead of speeding things up.
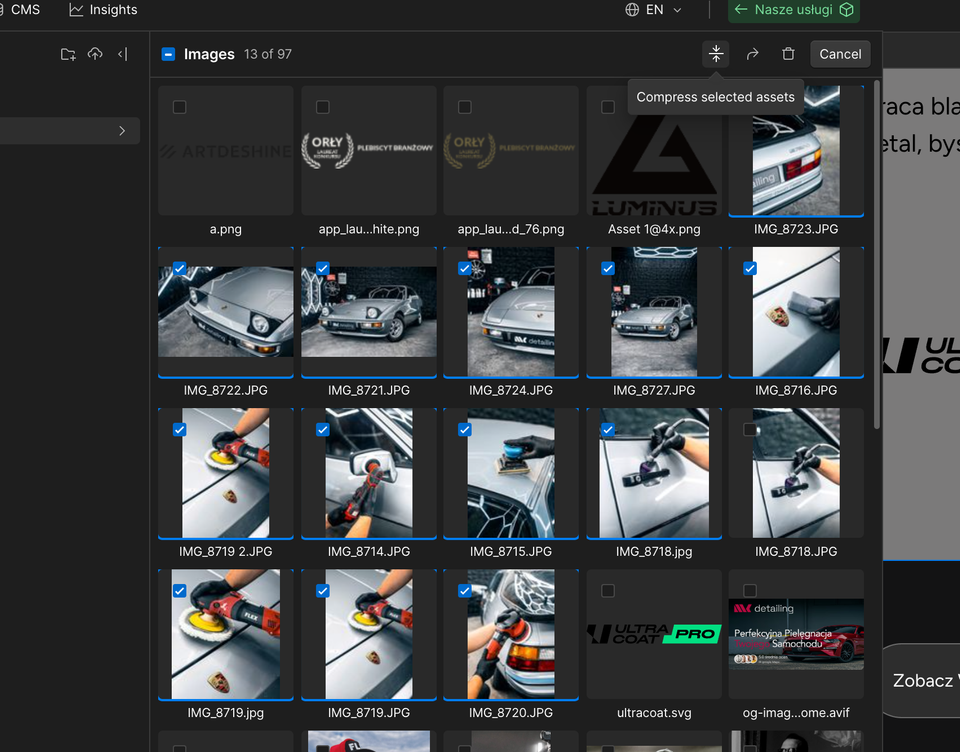
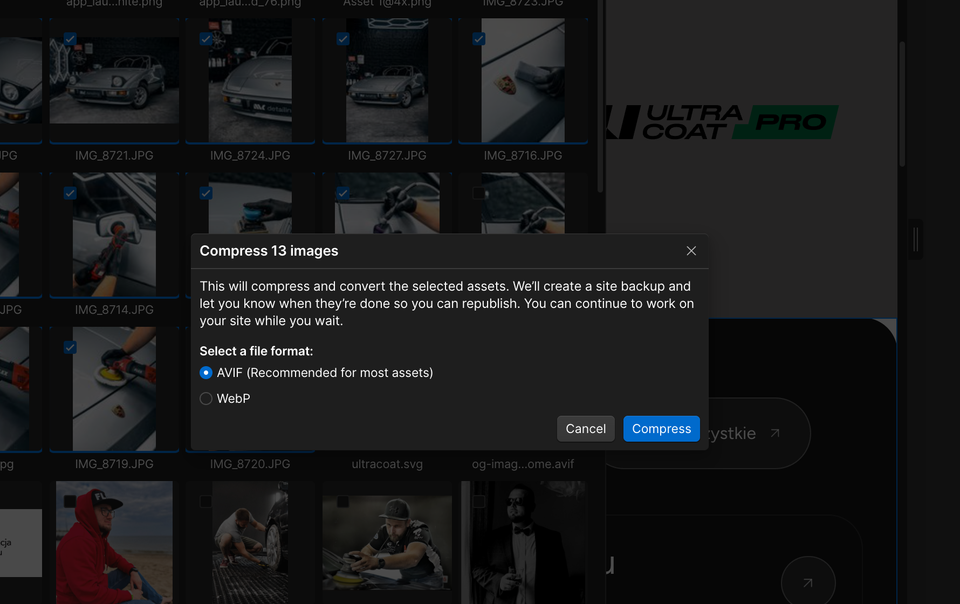
2. Compress Before You Upload
Webflow’s built-in optimization helps, but it’s not magic. Starting with a heavy, uncompressed image only gives Webflow more to struggle with.
What to do: Always compress your files first. Use TinyPNG, Squoosh, or ImageOptim to shrink file size without visible quality loss. A 4MB upload expecting to become 100KB is a recipe for poor results—start small instead.
Goal: smallest file size possible without losing clarity.
3. Use AVIF as Your Default Format
JPEG and PNG are still common out of habit. AVIF is simply better. It keeps image quality high at a fraction of the size—often 30–50% smaller than JPEG for the same result.
What to do: Export your images as AVIF from your design tool. Webflow automatically serves modern formats to compatible browsers and falls back gracefully for others. This one change can cut load times more than any plugin or setting.
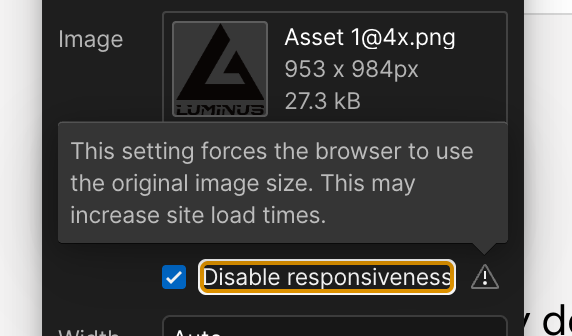
4. Specify Image Dimensions to Prevent Layout Shifts (CLS)
Performance isn’t only about how fast things load—it’s also about how stable they feel. If space isn’t reserved for an image, the layout jumps when it appears. That jump impacts your Cumulative Layout Shift (CLS) score and ruins the user’s sense of control.
What to do:
- Upload images with known, final dimensions.
- In Element Settings, confirm width and height are set.
- For background images, either switch to
<img>or define a fixed aspect ratio on their container.
Webflow usually handles dimensions automatically, but resized or responsive adjustments can override the defaults—so check twice.
5. Let Webflow Handle Responsive Sizes (srcset)
Serving a full desktop image to a mobile screen is a performance crime. Fortunately, Webflow automates responsive image generation.
When you upload a high-quality source file, Webflow creates multiple smaller versions and adds srcset and sizes attributes automatically. The browser then chooses the most efficient size for each device.
What to do:
- Upload one optimized, high-resolution image (ideally under 4MB).
- Ensure “Responsive Image” is enabled—it usually is by default.
- Publish and let the CDN handle the rest.
6. Don’t Skip Alt Text
Alt text supports accessibility and search visibility. It’s not just an SEO checkbox—it’s how both users and crawlers understand what an image represents.
What to do: Write clear, concise descriptions for meaningful images. Leave alt text empty (alt="") for purely decorative ones.
Join Newsletter
Don't miss practical guides like this – join our monthly newsletter!
Video Optimization: A Strategic Approach to Motion
Videos create atmosphere and tell stories—but they’re also the heaviest assets you can add to a page. Without careful handling, they dominate load time.
Animated GIFs are especially bad: massive in size, uncompressed, and lacking playback control. Replace them with short, optimized MP4 or WebM files whenever possible.
The right setup depends on what the video does on the page.
1. Background Videos (Ambiance and Motion)
Hero loops and background clips exist to create mood, not to play full stories.
In Webflow: Use the Background Video element. It supports .mp4 and .webm up to 30MB.
Webflow handles browser compatibility but doesn’t compress aggressively, so prep your files first.
Checklist:
- Keep it short (under 15s) and visually simple.
- Compress before uploading.
- Use Webflow’s native controls for looping and autoplay.
2. Inline Videos (User Engagement)
When the video is part of the content—something users actively watch—the hosting method matters.
Option A: Host Externally (Recommended)
Offload to YouTube, Vimeo, or Cloudflare Stream. It keeps your Webflow site lightweight and uses their global delivery networks for speed. Embed via the Video or Embed element.
Option B: Host in Webflow (Advanced)
You can upload MP4s directly (up to 4GB) but Webflow doesn’t give you playback controls by default. To make it work, use a custom Embed with your own <video> tag and HTML attributes. Use this only if you have a specific reason to self-host.
3. Defer Loading for Videos Below the Fold
If it’s not visible immediately, don’t load it immediately. Lazy-loading videos prevents bandwidth waste and improves Core Web Vitals.
What to do:
- Background videos: Webflow’s native component already handles lazy loading.
- Embedded iframes: Add
loading="lazy"to your<iframe>. - Custom
<video>tags: Includepreload="none"so the browser waits until the user presses play.
You can set custom attributes in Webflow to enable lazy loading where needed.
Font Optimization: Fixing the Silent Performance Killer
The default way to add fonts in Webflow—using its built-in Google Fonts integration—is convenient but slow.
The issue isn’t Google Fonts itself; it’s how Webflow loads them through an extra JavaScript file called the Web Font Loader. This adds multiple render-blocking steps:
- Browser downloads the loader script (external request).
- It runs the script, which fetches a CSS file from Google’s servers.
- That CSS file then points to the actual font files to download.
The chain is long, and each step adds latency. The fix: take control and self-host your fonts.
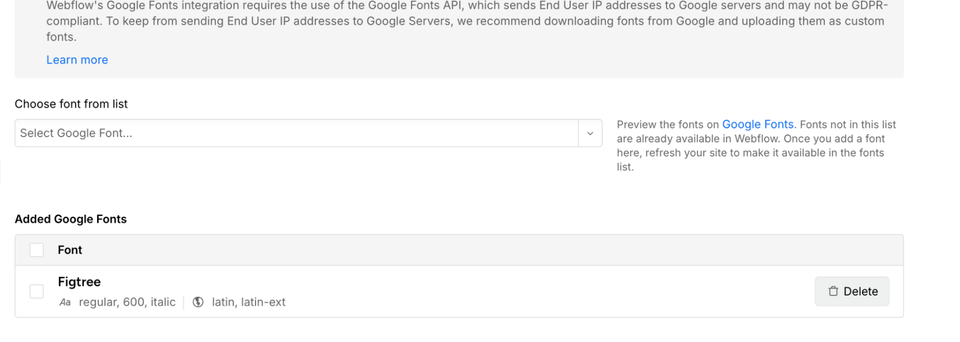
1. Self-Host Your Fonts
Hosting fonts yourself removes all those external requests and gives you full control. Fonts load directly from your own domain, reducing delays.
What to do: Download your font files from Google Fonts or your provider. Then upload them to Webflow via Project Settings → Fonts.
2. Optimize Format and Keep a Font Budget
Every weight is a separate file. If you add nine weights for a single family, you’ve multiplied load time.
What to do:
- Convert fonts to WOFF2—the most efficient format (tools like Transfonter handle this).
- Limit yourself to 2–3 weights per family (e.g., Regular, Medium, Bold).
- If you need flexibility, use a single variable font instead of multiple static ones.
3. Prevent Invisible Text with font-display: swap
By default, browsers hide text until the custom font loads—the “Flash of Invisible Text” (FOIT). It looks like the page is broken.
What to do: Add font-display: swap; to your @font-face rules. The browser will show fallback text immediately and swap the custom font once ready. The user sees content right away.
4. Choose a Smart Fallback Font
Even with swap, there’s a brief visual jump when the fallback switches to the custom font. You can minimize that by choosing a fallback font with similar metrics.
Example:
font-family: 'Inter', system-ui, sans-serif;Pick one close in weight and width to reduce layout shifts and maintain smooth transitions.
JavaScript Optimization: Don’t Block Rendering
Heavy or poorly loaded JavaScript can stall an otherwise optimized site. By default, scripts block rendering—the browser stops everything to fetch and run them before continuing. That pause can mean seconds of blank screen. The solution lies in how scripts are loaded: with async or defer. Both let the browser download in the background, but they behave differently.
Understanding async vs defer
async — Downloads and executes as soon as it’s ready.
- Good for scripts that don’t depend on anything else.
- Execution order isn’t guaranteed.
- Ideal for analytics, tracking, or small standalone snippets.
defer — Downloads in the background, waits until the HTML is parsed, then runs in order.
- Keeps execution sequence consistent.
- Best for scripts that interact with page content or depend on each other.
When to Use Each
- Use
asyncfor independent third-party scripts. - Use
deferfor scripts tied to page functionality.
When uncertain, defer is the safer default.
Putting It Into Practice in Webflow
In custom Embed blocks, manually add these attributes:
Before (blocking):
<script src="https://example.com/script.js"></script>After (optimized):
<script src="https://example.com/script.js" defer></script>The Pro Move: Load on Interaction
For non-essential scripts—like chat widgets or booking forms—don’t load them at all until needed. Use a small snippet to trigger loading only after a user interacts (e.g., clicks or scrolls).
We used this technique in one test to delay a HubSpot form script until interaction, freeing up resources and improving First Contentful Paint (FCP).
Webflow’s Built-In Optimization Features: What to Use, What to Avoid
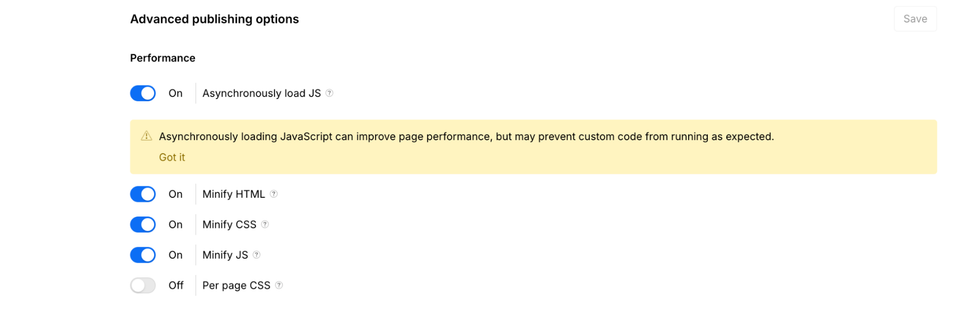
Webflow offers a few simple toggles under Project Settings → Hosting → Advanced Publishing Options that can make a real difference. Some help. One can hurt.
Always On
1. Minify HTML, CSS, and JS
Removes unnecessary characters (spaces, comments, line breaks) without changing function. Smaller files load faster.
Keep all three toggles on.
2. Use Secure Frame Headers
Adds the async attribute to Webflow’s core JavaScript file (webflow.js), preventing it from blocking rendering.
Turn this on for a noticeable FCP improvement.
What to Avoid
Disable “Use Per-Page CSS”
It sounds smart—smaller, page-specific CSS files—but in practice, it adds extra HTTP requests.
That overhead usually outweighs any savings. A single global stylesheet that the browser caches after the first visit is faster and simpler.
Keep “Use per-page CSS” off.
Advanced Optimization: Fixing Webflow’s TTFB Problem with Cloudflare
Even with perfect on-page optimization, Webflow has one unavoidable limitation: Time to First Byte (TTFB).
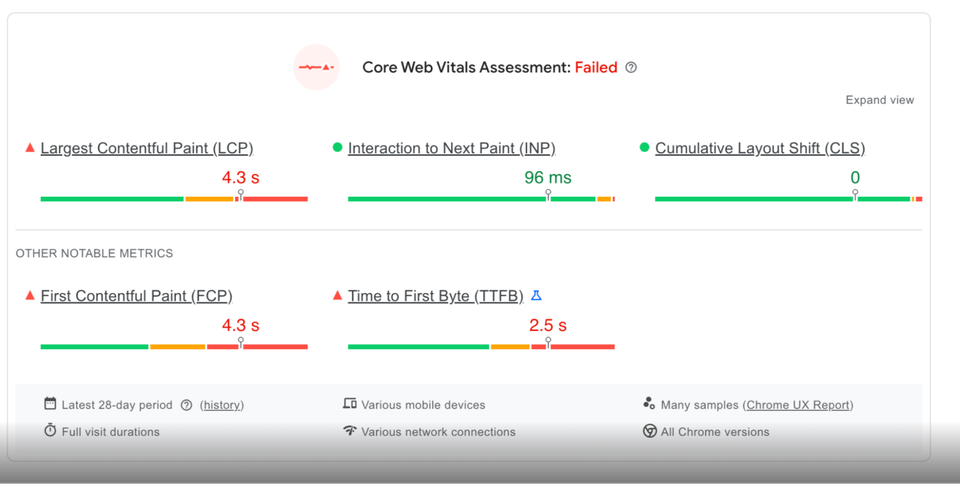
TTFB measures how long it takes for a server to start responding. Webflow’s hosting runs mainly on AWS servers in the US, which means anyone outside North America faces longer round-trip times.
That latency can’t be fixed inside Webflow—but it can be mitigated with Cloudflare.
Cloudflare isn’t just a CDN for assets. It can cache full HTML pages on its global edge network. You can read more about this in the excellent guide by Milkmoon Studio.
So a visitor in Frankfurt doesn’t fetch your site from the US—they get it instantly from a local server.
This shift can cut TTFB from hundreds of milliseconds to under 100.
Webflow recently announced plans to migrate hosting to Cloudflare’s edge, which should eventually help. Until that’s fully rolled out, a manual Cloudflare setup remains the best way to gain control and ensure global performance consistency.
Want a Webflow site that looks great and loads fast?
We build and optimize Webflow websites that perform flawlessly — from design to delivery.
Summary
Optimizing a Webflow site is less about ticking settings and more about understanding the rendering process.
You’ve now seen the main levers that make a real difference:
- Handle assets with discipline: compress images, choose AVIF, self-host fonts, and lazy-load videos.
- Control what blocks rendering: use
defer, disable per-page CSS, and turn on Webflow’s async options. - Solve the infrastructure bottleneck: reduce TTFB with Cloudflare to deliver consistent global speed.
The outcome isn’t just a better PageSpeed score—it’s a site that feels fast, stable, and trustworthy. And that’s what keeps visitors around.